

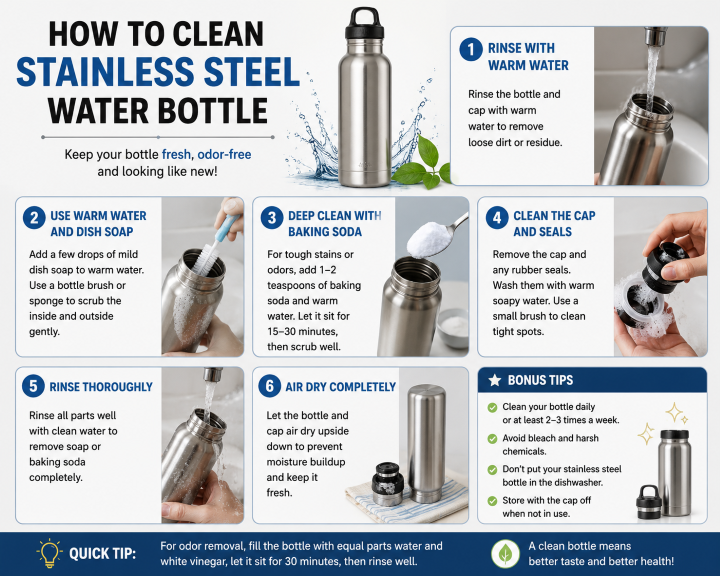
Stainless steel water bottles have become a staple accessory for anyone trying to reduce plastic waste, stay hydrated, and keep drinks at the right temperature for hours. They are tough, long-lasting, and free from the chemicals found in some plastic bottles. But there is one thing many owners overlook: stainless steel bottles need regular, proper cleaning to stay safe and pleasant to use.
Unlike a simple glass or plastic cup, a reusable water bottle has narrow openings, tight-fitting lids, silicone gaskets, straws, and sometimes double-wall insulation — all of which create hidden spots where bacteria, mold, mineral deposits, and odors can build up. A quick rinse under the tap is not enough to keep your bottle truly clean.
Why Cleaning Your Stainless Steel Water Bottle Matters
Before diving into the how-to, it helps to understand why this matters. A water bottle isn’t just a container — it’s an environment. Every time you drink from it, take a sip with wet lips, add ice, or pour in juice, coffee, or a protein shake, you introduce moisture, sugars, proteins, and bacteria into a warm, damp, dark space. That combination is exactly what mold and bacteria need to thrive.
Here’s what can happen if a bottle isn’t cleaned regularly:
- Bacterial buildup – Saliva and residue from beverages create a film on the interior walls, especially near the threads of the cap.
- Mold growth – Small amounts of moisture trapped in the lid, straw, or gasket can turn into mold within just a few days, particularly in humid climates.
- Odor development – Proteins from milk-based drinks, coffee oils, and sugary residues can cause bad smells that linger even after rinsing.
- Mineral and water stains – Hard water can leave white, chalky deposits (limescale) on the interior surface.
- Rust spots – While high-quality stainless steel resists rust, lower-grade steel or scratched surfaces can develop small rust spots over time if moisture sits too long.
- Metallic taste – A dirty or poorly maintained bottle can start to affect the taste of your water.
The good news: none of these problems require harsh chemicals or expensive products to fix. With a few common household items and a consistent routine, you can keep your bottle hygienic, odor-free, and looking new.
What You’ll Need
Most cleaning tasks for a stainless steel bottle can be handled with items you already have at home.
Everyday essentials:
- Warm water
- Mild dish soap (unscented is best, to avoid leaving a residual smell)
- A bottle brush with a long, flexible handle
- A small straw brush (if your bottle has a straw lid)
- A soft cloth or sponge (avoid steel wool or anything abrasive)
- A drying rack or clean towel
For deep cleaning and stain removal:
- White vinegar
- Baking soda
- Fresh lemon or lemon juice
- Denture cleaning tablets (optional, but effective)
- Hydrogen peroxide (for tougher mold or odor issues)
- Cotton swabs (for tight corners around the lid)
- Rubbing alcohol (for gaskets and silicone parts)
What to avoid:
- Bleach (can degrade silicone seals and leave harmful residue if not rinsed properly)
- Steel wool or abrasive scrubbers (can scratch the interior coating, especially on insulated bottles)
- Extremely hot water combined with cold-rinsing in an insulated bottle (can sometimes affect the vacuum seal, though this is more relevant during manufacturing defects than regular use)
- Harsh chemical cleaners not intended for food-contact surfaces
Daily Cleaning: The Habit That Prevents Bigger Problems
The single most effective thing you can do for your bottle’s hygiene is to clean it every single day, even if you only used it for water. This simple habit prevents the buildup that leads to odors, stains, and mold in the first place.
Step-by-Step Daily Cleaning Routine
Step 1: Empty and rinse immediately after use: Don’t let a bottle sit overnight with liquid still inside, especially if it contained anything other than plain water. As soon as you’re done using it, empty any remaining liquid and rinse with warm water.
Step 2: Disassemble the bottle: Remove the lid, straw (if applicable), gasket or O-ring, and any other detachable parts. Cleaning a bottle without taking it apart is one of the most common mistakes people make — most of the odor and bacteria buildup happens in these small components, not the main body.
Step 3: Wash with warm, soapy water: Add a few drops of mild dish soap to the bottle and fill it about halfway with warm water. Use a bottle brush to scrub the interior walls, paying close attention to the bottom, which is often missed. For narrow-necked bottles, a long, flexible brush is essential to reach the base.
Step 4: Clean the lid and small parts separately: Lids are often more complex than the bottle itself, especially if they have flip-tops, straws, or silicone spouts. Use a small brush (an old toothbrush works well) to scrub around threads, vents, and crevices. If your bottle has a straw, use a dedicated straw brush to push through the entire length, since this is a very common spot for mold.
Step 5: Rinse thoroughly: Rinse every part under running water until no soap residue remains. Leftover soap can affect the taste of your next drink.
Weekly Deep Cleaning: Going Beyond the Surface
Even with daily washing, residues can accumulate over time — especially if you regularly drink coffee, tea, smoothies, protein shakes, or flavored water. A deeper clean once a week helps address what a quick soap-and-water wash can miss.
Method 1: White Vinegar Soak (Best for General Deep Cleaning)
White vinegar is a mild acid that’s excellent at breaking down mineral deposits, killing many types of bacteria, and neutralizing odors — all without damaging stainless steel.
How to do it:
- Fill the bottle about halfway with white vinegar and top off the rest with warm water.
- Let it sit for 30 minutes to a few hours, depending on how dirty the bottle is. For heavily soiled bottles, an overnight soak works well.
- After soaking, scrub the interior with a bottle brush.
- Empty the vinegar solution and rinse thoroughly with warm water — rinse at least two to three times to remove any vinegar smell.
- Let it air dry completely.
This method is particularly effective for removing the dull, slightly sticky film that can build up inside bottles used for anything other than plain water.
Method 2: Baking Soda Paste (Best for Stains and Odors)
Baking soda is a gentle abrasive and natural deodorizer, making it ideal for scrubbing away stains without scratching the interior.
How to do it:
- Mix two to three tablespoons of baking soda with a small amount of water to form a thick paste.
- Apply the paste to the interior walls using a bottle brush or sponge, focusing on stained areas.
- Let the paste sit for about 15–20 minutes.
- Scrub gently, then rinse thoroughly with warm water.
- For extra odor control, you can follow this with a vinegar rinse (though not at the same time, as they’ll react and fizz).
Method 3: Baking Soda and Vinegar Combination (Best for Tough Odors)
For bottles with a lingering smell that won’t go away with either method alone, combining both — used sequentially, not simultaneously — can help.
How to do it:
- First, sprinkle 2 tablespoons of baking soda directly into the bottle.
- Add a cup of warm water and swirl to dissolve.
- Let it sit for 10 minutes, then rinse.
- Follow with the vinegar soak method described above.
- Rinse thoroughly and air dry.
Method 4: Denture Tablets (Best for Convenience)
Denture cleaning tablets are formulated to break down organic buildup and are surprisingly effective on water bottles.
How to do it:
- Fill the bottle with warm water.
- Drop in one or two denture tablets.
- Let it fizz and sit for 15–30 minutes.
- Scrub with a bottle brush, then rinse thoroughly several times.
This method is especially useful for people who want an easy, low-effort deep clean without measuring vinegar or baking soda.
Method 5: Hydrogen Peroxide (Best for Mold or Heavy Bacterial Buildup)
If you notice visible mold spots, discoloration, or a musty smell that persists after other methods, hydrogen peroxide can help.
How to do it:
- Fill the bottle with a mixture of half water and half 3% hydrogen peroxide.
- Let it sit for about an hour.
- Scrub thoroughly with a bottle brush, paying attention to any visible dark spots.
- Rinse multiple times with clean water to ensure no residue remains.
- Air dry completely.
Always rinse extremely well after using hydrogen peroxide, since any leftover residue isn’t something you want to ingest.
How to Clean the Lid, Straw, and Silicone Gasket
The lid and straw are often the dirtiest parts of a water bottle, yet they’re the parts people clean the least thoroughly. Their small crevices, threads, and airtight seals trap moisture and residue in places a bottle brush simply can’t reach.
Cleaning a Standard Screw-Top Lid
- Remove any rubber gasket or O-ring from inside the lid.
- Soak the lid in warm, soapy water for 10–15 minutes.
- Use an old toothbrush to scrub around the threads and any small grooves.
- Rinse thoroughly and set aside to dry, ideally standing up so water doesn’t pool inside.
Cleaning a Flip-Top or Spout Lid
These lids often have a small silicone spout with a narrow opening that’s easy to overlook.
- Open the spout fully and, if possible, remove it from the lid housing.
- Use a cotton swab or pipe cleaner to clean inside the narrow opening.
- Soak the entire lid assembly in warm soapy water or a diluted vinegar solution for 15–20 minutes.
- Scrub gently with a small brush, then rinse thoroughly.
- Squeeze or press the spout a few times while rinsing to flush out any trapped soap.
Cleaning a Straw
Straws are notorious for mold growth because water often sits inside them after use.
- Remove the straw from the lid completely.
- Use a straw-specific cleaning brush (thin, long, and flexible) to scrub the entire interior length.
- Soak the straw in a vinegar-water solution or with a denture tablet for extra cleaning power.
- Rinse thoroughly and let it air dry standing upright, or shake out excess water and place on a drying rack.
Cleaning the Silicone Gasket or O-Ring
This small rubber ring is one of the most commonly neglected parts, yet it’s a prime spot for mold due to constant moisture exposure.
- Remove the gasket from the lid.
- Wash it separately with warm soapy water, using your fingers or a soft brush to clean both sides.
- For mold or black spots, soak the gasket in a mixture of equal parts water and white vinegar for 20–30 minutes, or use diluted rubbing alcohol for extra disinfecting power.
- Rinse thoroughly and dry completely before placing it back into the lid.
Tip: If a gasket has developed mold that won’t come off even after cleaning, it’s often more hygienic (and inexpensive) to replace it. Most bottle brands sell replacement gaskets and lids separately.
Removing Specific Problems
How to Remove Odors
Persistent smells are usually caused by trapped moisture combined with organic residue (coffee oils, protein powder, fruit pulp, etc.) that soap alone hasn’t fully broken down.
Best approach for odor removal:
- Start with a baking soda soak (as described above) to absorb and neutralize smells.
- Follow with a vinegar rinse to kill any remaining bacteria.
- If the smell persists, try the hydrogen peroxide method.
- As a final step, leave the bottle open with a few tablespoons of dry baking soda inside overnight — this can help absorb any lingering odor before your next wash.
How to Remove Stains and Discoloration
White, chalky stains are typically mineral deposits from hard water, while brownish stains often come from coffee or tea residue.
For mineral (limescale) stains:
- Soak in undiluted white vinegar for a few hours, then scrub with a bottle brush.
For coffee or tea stains:
- Make a baking soda paste and scrub gently, or try a mixture of baking soda and a few drops of lemon juice for extra stain-lifting power.
For rainbow or discoloration marks (common in insulated bottles):
- This is sometimes caused by heat exposure (like putting an insulated bottle in the dishwasher against manufacturer instructions) and may not be fully reversible, but a vinegar soak can often reduce its appearance.
How to Remove Rust Spots
Rust on a genuinely high-quality stainless steel bottle is uncommon, but it can happen, especially if the protective layer has been scratched or if lower-grade steel was used.
Steps to remove light rust:
- Make a thick paste of baking soda and water.
- Apply directly to the rust spot and let it sit for 20–30 minutes.
- Scrub gently with a soft cloth (avoid anything abrasive that could scratch the surface further).
- Rinse thoroughly and dry completely.
- If rust persists or is extensive, it’s best to stop using the bottle, as ingesting rust flakes isn’t advisable — this is a sign it may be time to replace the bottle.
How to Remove Mold
Mold typically appears as black, green, or pink spots, most often in the lid, straw, or gasket rather than the main body of the bottle.
- Disassemble the bottle completely.
- Soak affected parts in a mixture of equal parts water and white vinegar, or diluted hydrogen peroxide, for 30–60 minutes.
- Scrub thoroughly with a small brush, reaching into every crevice.
- Rinse multiple times with clean water.
- Allow all parts to air dry completely — mold thrives in moisture, so this step is critical.
- If mold has deeply penetrated a silicone part and won’t fully come out, replace that part rather than risk regrowth.
Can You Put a Stainless Steel Water Bottle in the Dishwasher?
This is one of the most common questions bottle owners have, and the answer depends on the type of bottle.
- Single-wall stainless steel bottles (without vacuum insulation) are often dishwasher-safe, but always check the manufacturer’s instructions first.
- Double-wall vacuum-insulated bottles are generally not recommended for the dishwasher. The heat and pressure can potentially damage the vacuum seal over time, reducing insulation performance, and may also damage any powder-coated or painted exterior finish.
- Lids, straws, and gaskets are often dishwasher-safe even when the main bottle isn’t, but it’s best to place them on the top rack, away from the heating element, and check manufacturer guidance.
When in doubt, hand-washing is the safest option for both the bottle and its insulation performance.
Common Mistakes to Avoid
- Only rinsing with water and never using soap: Water alone doesn’t break down oils, proteins, or bacteria effectively.
- Forgetting to clean the lid and straw: These parts often harbor more bacteria than the bottle itself.
- Storing the bottle closed while still damp: This traps moisture and accelerates mold growth.
- Using bleach. It can degrade silicone parts and, if not rinsed out completely, isn’t safe for a food-contact surface.
- Using abrasive scrubbers: Steel wool or harsh scouring pads can scratch the interior lining, especially in insulated bottles, creating tiny grooves where bacteria can hide.
- Leaving beverages other than water in the bottle for extended periods: Milk-based drinks, juices, and sports drinks spoil quickly and should be rinsed out as soon as possible.
- Skipping the weekly deep clean: Daily rinsing helps, but weekly deep cleaning addresses buildup that a quick wash won’t remove.
Building a Simple Maintenance Routine
To keep your stainless steel water bottle in the best possible condition without much effort, follow this simple schedule:
Every day:
- Empty, disassemble, rinse, and wash with soap and water.
- Air dry completely before reassembling or storing.
Once a week:
- Deep clean using a vinegar soak, baking soda paste, or denture tablets.
- Clean the straw and gasket separately with a small brush.
Once a month:
- Inspect the gasket and straw for signs of mold or wear.
- Check the exterior and interior for scratches, rust spots, or dents that may need attention.
- Consider a hydrogen peroxide soak if you notice any lingering odor despite regular cleaning.
As needed:
- Replace the gasket, straw, or lid if mold persists after cleaning or if parts show visible wear.
Final Thoughts
A stainless steel water bottle is built to last for years, but its longevity and hygiene depend heavily on how well it’s maintained. The good news is that keeping it clean doesn’t require expensive products or complicated routines — just a few minutes each day and a slightly deeper clean once a week using ingredients most people already have at home, like vinegar, baking soda, and mild dish soap.
The most important habit to build is disassembling your bottle fully before washing and making sure every part is completely dry before you put it back together. This single step prevents the vast majority of odor, mold, and bacteria problems that reusable bottle owners run into.
With a consistent routine, your stainless steel water bottle will stay fresh, odor-free, and safe to use for a very long time — making it a genuinely sustainable alternative to single-use plastic bottles.
Frequently Asked Questions
How often should I wash my stainless steel water bottle? Ideally, wash it every day with soap and water, and do a deeper clean (vinegar, baking soda, or denture tablets) at least once a week.
Why does my water bottle smell even after washing? This is usually caused by trapped moisture or residue in the lid, straw, or gasket rather than the main bottle body. Make sure to disassemble and clean every part separately, and always let everything dry completely before closing the bottle.
Is vinegar safe for cleaning stainless steel? Yes, white vinegar is safe and effective for stainless steel. Just make sure to rinse thoroughly afterward so no vinegar smell or taste remains.
Can I use bleach to clean my water bottle? It’s best to avoid bleach, as it can damage silicone gaskets and may leave residue that isn’t safe for a container you drink from. Vinegar, baking soda, and hydrogen peroxide are safer, equally effective alternatives.
Why is there a metallic taste in my water? This can happen if soap residue is left behind or if the bottle has developed light surface corrosion. Try a thorough vinegar rinse, and if the taste persists, inspect the interior for scratches or wear.
How do I know if I should replace my bottle instead of cleaning it? If you notice persistent rust, mold that won’t come out of the silicone parts even after deep cleaning, or dents that compromise the seal, it may be time to replace the bottle or its individual parts.